6.29.2011

red, white and blue

As promised here is an easy 4th of July project that takes under 5 minutes to do and adds a little festive touch to your home.
I found the already cut out felt stars in the dollar section at Joanne.
Of course if you already have felt and want to do it yourself go ahead but I knew my stars would not look that great so I spent the $3.00 {for 3 packs} and called it a day. All I needed for this project was my twine and hole puncher {both of which I already had} and I could get to work.
Just punch one hole in the top of each star and then add the stars one at a time to your twine.
I really like how it looked all stacked up and will have to remember to get more stars next year to try and achieve this look.
Once I had them all added to the twine I simply hung them from my fireplace. For $3.00 total I loved how this turned out!
Yesterday, I also made this little onesie for Will to wear on Monday. 
I have been looking for a fourth of July outfit this past week but I guess I waited to long and have not been able to find anything so I had to make one myself. Not perfect but since he will only wear it once I think it will serve it's purpose for the pictures :) Please excuse the non ironed mess. I promise it looks cuter in person!  I already had the fabric, onesie and the iron on webbing so this little outfit was free.

I am off to my office garage to finish spray painting a project that I have been working on. Cannot wait to show you all the finished product!

6.28.2011

we made it to 6 months

My baby boy turned 6 months today and we celebrated by taking him to the doctor this morning for his 6 month check-up. I snapped a few photos of him sitting like a big boy waiting for the doctor.
Just for kicks below are a few of Will's month by month pictures. It is so fun to see how the little man has changed over the past 6 months! The first picture is a pretty good representation of how both he and I spent the first month :)
Thankfully at two months he started to show us his sweet side. Love that little man.
I will be back tomorrow with a fun and easy 4th of July craft so stay tuned!

6.24.2011

a china cabinet redo

When we moved into our townhouse last year I started looking for something to hold all of my china and dish sets. I knew I needed something large that had more display shelves then storage so when I found this cabinet for $70.00 on craigslist I knew it was meant to be! I did not get any before pictures of the china cabinet {I feel like that has been the story of my life recently, sorry!} but if you google 1970's china cabinet you will get an idea of what I had to work with. 

I removed the cabinet doors and switched out the glass shelves for woods ones {Home Depot cut the wood down to size for me and then I painted the shelves the same color as the cabinet}. It sat like this for a few months but I felt like it needed something more. My first thought was to put wallpaper or even wrapping paper up as the background but with the stencil in the dining room I was afraid that would be to much pattern since the rooms are open to one another.
I have always loved my pillows made out of fabric from Ballard Design and since one of the pillows sits right in front of the cabinet I wanted to use one of those colors for the back of the cabinet. I selected the dark grey/brown which is the background color in the fabric and my ironstone collection really stands out now.
The tureen below is one of my favorite ironstone pieces. It is in perfect condition which is hard to find. I think I got it at Lucketts a few years ago.
The below is another favorite of mine and I think it is a toothbrush holder. I could be wrong so if you know what it is I would love to know for sure! I got this piece at the Big Flea with my mother in law two years ago. If you are in the Northern Virginia area and love antiques I would highly recommend going to the Big Flea. It never disappoints!
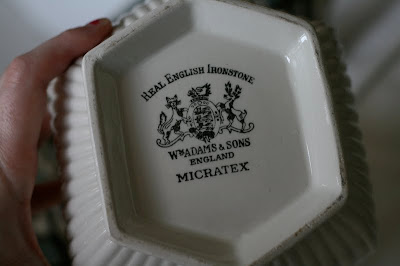
The stamps located on the bottom of the china pieces show that they are authentic. I love all of the different patterns that the companies have.
Well I am off to sew some new curtains for my living room. The only other curtains I have sewed were for Will's room so I am a little nervous! Wish me luck! Have a great weekend!

6.23.2011

the nursey: details

First I have to say thank you to Rachel from In No Simple Language for the feature on her beautiful blog. I had no idea she was going to do this yesterday and it made my day week! Also, thank you so much you all for the sweet comments/emails on Will's room. A lot of you are new friends so welcome! You all know how to make a girl's day with your sweet words. This room is so special to me since it is where my little guy sleeps and I love that you all like it too!

I got a few comments and emails about items in the room so I am going to try and answer them here. If something is not clear or I did not answer your question please let me know!

Chevron Paper Matting
The paper actually came from Michaels purchased last fall. It was from one of their paper booklets or at least I think that is what it is called :) Here is a picture of the front of the packet and a sample of some of  my favorite pages!
I LOVE this booklet and have used many of the paper designs throughout my home.  Not only does it have blue and greens but pinks, oranges and reds as well so if you have a girl there are patterns for you as well! Make sure to bring one of their 40% off coupons with you!

Display Frame
I have a tutorial here but if you have more questions let me know. The shutter hooks came from homegoods years ago and I really wish I had gotten more. I am hanging bibs and burp cloths from them now for easy access when we feed Will in my favorite chair since he likes to "share" as my dad calls it {aka - spit up all over the place}.

Furniture Details
Bookcase: Target, Book Shelf: Pottery Barn Kids, Aqua Baskets: Homegoods

Covered Letter Tutorial
I made these or well I should say I covered the above letters myself. I purchased the letters at Joanne's for $2.99 each and then covered 2 of the letters with paper from the Michaels packet I mentioned above. The paper below on the left is from Joanne's and I picked it up when I got the letters. Make sure to get 2 sheets of each paper you want to use if covering all sides of your letter.
The next step is to decide what paper should go with which letter. You could skip this step if you don't care or want a more eclectic look. I tend to be more obsessive and wanted to pick out the order :)
Once I knew which paper went with which letter I flipped the paper over and traced each side of the letter. Make sure to number each side of the actual cardboard letter and then number the traced side on the paper so when it is all cut out you won't be confused as to which sides goes where.
Lastly, cut out all the shapes and then glue them to your letters. I ended up just using the mod podge as glue and did not cover the whole letter with it when I was done. I did not think that step was necessary since the letters are more for decoration then functional.
After the glue dries stand back and admire your work! I did learn that the thinner the paper the easier it was to glue and adhere to the letters. One of the papers I selected was cardstock I had to re-glue it a few times before it really stuck.
Good luck and I'd love it if you would send me pictures if you make these at home!

My mother in law texted me Monday to say that she had read my nursery post all the way to the end but that there were no pics of Will so I'd thought I would include some today for all you Will fans {hi Grammy and Nona :)} Someone has been practicing sitting up! What a big boy!
Welcome again to all my new readers and friends! I am so glad you have stopped by!

6.20.2011

the nursery

My baby is almost 6 months and I am still working on his nursery! As he gets older I have been changing a few things so I thought I better show you all some pictures before I keep redecorating!

This room is small. I bet most of you have closets that are just as big if not bigger then this room :)  It was a challenge at times to decorate but I have loved creating this space for my little guy. {Please ignore the non-ironed slipcover on the rocker. I have had it for over 6 months now and still have not ironed it :)} Also the dresser used to be Will's changing table but since we mostly change him in his crib I swapped it out for a Pepsi crate {thanks mom!} for storage of his summer hats and sunglasses as well as his favorite toys for easy access and a glass cake stand that used to be by Nana's for my favorite baby items that people have given us.
 
antique dresser, pepsi drink crate, glass cake stand, bla bla stuffed animal, ikea white frames, chevron paper mat, aqua nursery
I really wanted this swivel glider from Lee Industries and my grandparents were so generous to give it to us as a baby gift. It is the perfect size for this small room and I had it slipcovered in a white twill so when my baby is not a baby anymore and does not want to be rocked I can move it to the family room. Also I found that white is the easiest to clean when baby accidents happen if you know what I am saying :) A little warm water and oxi clean and it is a good as new!
Behind the chair are the curtains I made from discount fabric ($8.00 a yard) from Mary Jo's located outside of Charlotte, NC.
When my mom and I were in Charlotte visiting my Nana last summer we took an afternoon trip to Mary Jo's and when I saw this fabric I knew this would be perfect for the curtains. I loved the texture (similar to a large seersucker) and the stripes.
I ended up pulling out the aqua color in one of the stripes to do the walls since I wanted a gender neutral color. I lined the curtains with blackout lining so Will would sleep during the day and so far so good!

I always wanted a spindle crib for my babies. I looked for a long time for a vintage one and was going to paint it grey to make it a little different from all the other spindle cribs you see but I could not find one on craigslist. I ended up going with this one and really do love the white now that I have lived with it. However, with that being said tomorrow it could go grey. I seem to change my mind all the time :).


I made the crib skirt myself because I wanted it to be adjustable. I knew we needed to use the space under the crib as storage and I do not like how most store bought crib skirts don't touch the ground. I just made three panels that are lined so they would hang straight since the fabric is lightweight. It is not perfect but I love that you cannot see all of the junk under the crib!
This dresser was my Nana's and I like the warm wood tone it brings to the room. I was going to paint it but the blinds left behind from the previous owner are wood toned as well so it makes them look more purposeful then convenient :) I still might change out the hardware but for now it works. I can see this being used in Will's big boy room one day. I love the key holes.
Since the closet was built out into the room there is a space behind the door for a mirror with some hooks for all of Will's towels and blankets.
Below are some detailed pictures from the room.
If you made it to the end of this post thank you! I had so much fun decorating this room and cannot wait to see my little guy enjoy it as he gets older.
Related Posts Plugin for WordPress, Blogger...